 Filter by Popular Categories
 Filter by Popular Categories
Soil Testing
for New Farmers
A Step by Step Guide
‘Feed the soil, not the plants’ is a great way of looking at the importance of managing soils for food production. Soils vary in diversity from one location to another, and require comprehensive management strategies for on-site nutrient recycling and long-term land stewardship. Healthy soils will grow healthy crops, and knowing what types of soils you are working with will help you figure out what will grow best on your land.
For a farmer on a new piece of land, there are a few methods that will reveal what type of soil and nutrient content you are working with. Soil testing, on an ongoing basis, is an important diagnostic tool to work out next steps and identify trends and patterns for making soil management decisions over time. Soil testing is inexpensive when you consider how much it can save you in amendments, crop failures, and future headaches.
Soil Testing: Up Close and Personal
The first step in soil testing is a soil texture test done with your eyes and hands. This is essential to determine what you are working with. Dig out some soil—enough to roll a small ball between your hands and press into a ‘ribbon’. Look for the following:
- Check out this video on Youtube to watch a soil ribbon test in action: https://www.youtube.com/watch?v=fufeaLBLGlk
- When you squeeze it with your thumb does it crumble easily or stick together? How loose? How sticky?
- Does the soil hold moisture well?
- Does the soil dry out quickly?
- Loose can indicate that the soil is sandy, meaning good drainage but potentially poor nutrient retention. Sticky can indicate that the soil has a high percentage of clay, meaning higher nutrient retention but potentially poorer drainage depending on overall composition.
- Are there worms and other creatures in the soil that you can see with your eyes? Insect life helps to demonstrate beneficial soil food web activity. Like looking for animals and birds in the forest, if there’s no sign of life then something is up. No insects in the soil indicate that the ecology needs some TLC to get the nutrient and life cycles back in balance.
What is the site history?
- What past activities have taken place on the land?
- Are there fundamental ecological functions and cycles that have been lost on site? How could they be brought back? Are there signs of bird and animals use? Tracks, nests, poop?
- If the land has been used for production, industrial, or commercial activities, what sort of contaminants could these activities have left behind? How deep could the contamination go? You’ll need to seek out an Environmental Testing Laboratory near you to run tests to see if your soil is contaminated. The site history can help you decide what tests need to be run, as there are tens of thousands of possible testable substances, and you want to refine what you are looking for, to reduce the expense of testing. Here’s a great guide on soil testing for urban gardens.
- If contamination is confirmed, is this a problem you will be able to remediate? If so, what is your remediation timeline and capacity? Are there resources in your community to support soil remediation? For more info on bioremediation, check out Leila Darwish’s book Earth Repair.
Other things to look for in assessing your site and soils:
- Do people and animals (nature trails) like to cut through or use the site?
- How does water flow through the site? Does it run off? Where to? Does it pool? Where?
- How does the soil look? Is it compacted?
- What plants, if any, are growing on site? Where are there plants? Where are there bare spots? Water lovers or drainage lovers? What do those plant indicate? Wikipedia is an excellent resource for learning more about plants, preferred growing conditions, and their ecosystem functions.
- Are there debris piles? Where and what is in them? Are they safe to move? Are there any weird substances on site?
- How does the sun move through your site? Where is there sun, where is there shade, and for how long?
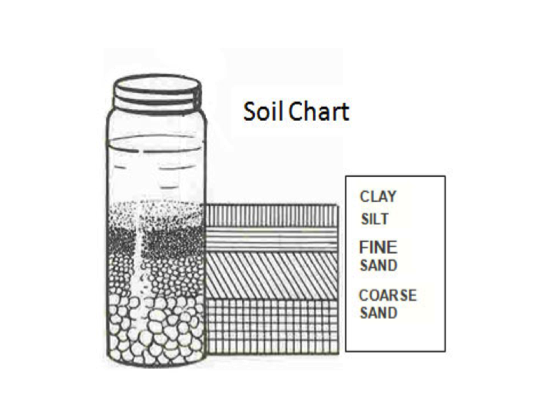
The Jar Test
The soil fractional test, or jar test, is a simple way to accurately determine the composition of your soil, and how much sand, silt and clay you are working with.
Ready your sample:
- Take a tbsp. of soil from multiple locations where you hope to grow food, at depths from the surface to eight inches, and mix them together. Aim to fill a quart size mason jar.
- Dry the sample thoroughly in an oven.
- When fully dry, pulverize the soil as finely as possible. Rolling pins, mallets, or rounded stones all work. Soil labs often use an old blender.
Assemble your equipment:
- One quart size mason jar with a tight lid
- One cup of finely pulverized dry soil
- One tsp of non sudsing dishwashing detergent, such as Borax
- A watch or clock
- A crayon
Fill the jar 2/3 full of water, pour in the soil and detergent, fasten the lid securely, and shake the jar vigorously for 10-15 minutes. Then set the jar where it won’t be disturbed.
Observe:
The sand particles in the soil are the largest and heaviest. Sand will settle to the bottom of the jar within one minute. At the end of one minute, mark the jar with a crayon to indicate the level of the sand.
Silts are much smaller and require a longer time to settle out. In two hours, virtually all the silt particles will have deposited in a second layer. Mark the level of silt on the jar.
Clay particles are very small. They go into suspension readily and stay there for a while. After a few days, they will settle—you’ll notice the water has cleared. Mark the level on the jar.
Time for some math! Use a ruler to measure each layer. A is the thickness of the sand deposit, B the silt, C the clay, and D the combined thickness of all three deposits. The equation below will show you the proportions of sand, silt, and clay in your soil.
Percent of sand = (A x 100) / D
Percent of silt = (B x 100) / D
Percent of clay = (C x 100) / D
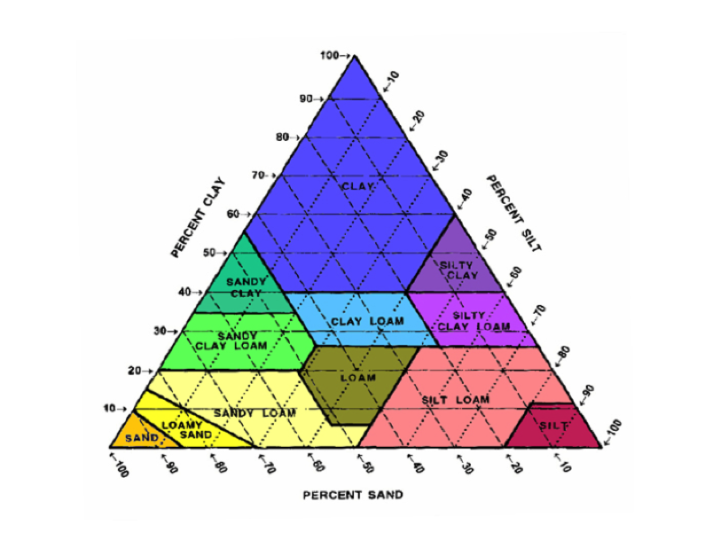
Once you’ve determined the basic composition of your soil, it’s time to get nerdy and figure out what your soil is called. You can use the soil texture classification chart to assess what type of soil you have by taking the percentages you have calculated and figuring out where on the pyramid your soil is. Check out Wikipedia for more info.
Lab Soil Analysis
Labs can test for a variety of things: nutrient levels (excess or deficiencies), soil acidity, sodium and soluble salts, organic matter, cation exchange capacity (CEC, or a soil’s capacity to retain and release cation elements such as K, Ca, Mg, and Na) and Ph. Call your local soil lab to ask for instructions for collecting samples. Here is a basic overview:
Take care to follow the necessary steps to obtain a representative sample; a poor sample could lead you astray.
First, determine the area that will be represented by the sample. Soil physical appearance, texture, colour, slope, drainage, and past management should be similar throughout the area. It may be helpful to draw a map of the property and identify areas where you will collect samples. If the soil differs significantly from one food growing area to another, you will want to section out testing areas, for long-term testing and developing soil management strategies.
Using a clean bucket and a spade, auger, or sampling tube, collect 12 or more subsamples to a depth of six to eight inches (deep rooted perennial crops can require deeper subsurface sampling) from random spots within the defined area. Avoid sampling field or plot edges and other non-representative areas. Avoid sampling when the soil is very wet or within six to eight weeks after a lime or fertilizer application.
Next, break up any lumps or clods of soil, remove stones, roots, and debris, and thoroughly mix subsamples in the bucket. Once the sample is mixed, scoop out approximately one cup of soil and spread on a clean sheet of paper to air-dry. A fan set on low will help speed the drying; do not apply heat. Do not submit wet soil samples to the lab.
Place approximately one cup of your dry sample in a plastic zip-lock bag. Label each Ziplock bag with your sample ID (you create this) and complete the submission form.
Unusual problem areas should be omitted or sampled separately. To properly diagnose the causes of poor crop production, collect separate composite samples from the good and poor growth areas. Do not include soil from the row where a fertilizer band has been applied.
Taking good records when you first sampled (temp, moisture, rain, etc.) and making sure you sample under similar conditions again is the best way to ensure accurate results.
Cold temperature soil will have less active biology than warm soils. Sampling when your soil is at an average temperature for the growing season is recommended, although not necessary.
For a list of soil labs in B.C., visit the Young Agrarians UMAP. Type soil into the search field and you will see our list of labs and other resources. Know a good soil resource? Add it to the UMAP!
Soil Food Web
The life in the soil is as important as the soil texture and chemical composition in terms of growing healthy foods- and creating what wine connoisseurs describe using the French word ‘terroir‘ or flavour. Healthy soils are alive soils. As we’ve learned more about soils over time, folks like Dr. Ingham have developed methodologies for measuring the bacterial and fungal life in the soil. Measuring life is complex; the main limitation is the diagnostic tools we have available. However, patterns emerge and guide us on our way as food producers. A basic rule of thumb is that perennials generally love fungal-dominant soils, and annual vegetables prefer bacterial-dominant soils. Check out Dr. Ingham’s website for more info: https://www.soilfoodweb.com/
The Creation of Soils over Time: Pedogenesis
If you like complicated equations (the farm nerd in us sure does!), this is how you get soil:
SOIL = f(C, PM, R, O, V) x time
C = climate
PM = parent material
R = relief/topology
O = fauna (all animal life)
V = flora (plant life)
Click the Wikipedia links above to nerd out more on how soils are formed on earth. Nature is pretty amazing.
What next?
Soil testing will give you the information you need to start understanding what your soil needs and how to manage it over time. In B.C., for help interpreting your results and guidance on amendments, reach out to an agrologist at the Ministry of Agriculture.